Deploying a Public Cloud Load Balancer
455 Views
Objective
This tutorial explains the following Load Balancer configurations:
- Deploying a basic HTTP Load Balancer Private → Private
- Deploying a basic HTTP Load Balancer Public → Private
Requirements
- A Public Cloud project in your OVHcloud account
- A private network configured in your project
- Prepare the environment to use the OpenStack API
- Set OpenStack environment variables
- OpenStack Octavia client installed
Instructions
Load Balancer within your Private Network (Private → Private)
When you create a Load Balancer, by default it gets a private IP in the private network selected during its creation.
We want to balance the load between the two backends: backend--1 and backend--2.
Step 1: Create the Load Balancer
Load Balancer Flavors
If you do not provide the parameter --flavor during the creation, the Load Balancer will be of a small size.
Use the following command to display the flavors in OpenStack:
Status
The Load Balancer creation will take some time, mainly to create the instance and to configure the network.
For the next configuration, you will have to wait until the provisioning_status becomes ACTIVE.
You can already see when creating our Load Balancer that it is associated with a Virtual IP address (VIP).
This will be our Load Balancer IP inside our Private Network.
Step 2: Create a listener
Step 3: Create the pool
Step 4. Add the servers
Step 5. Use your Load Balancer
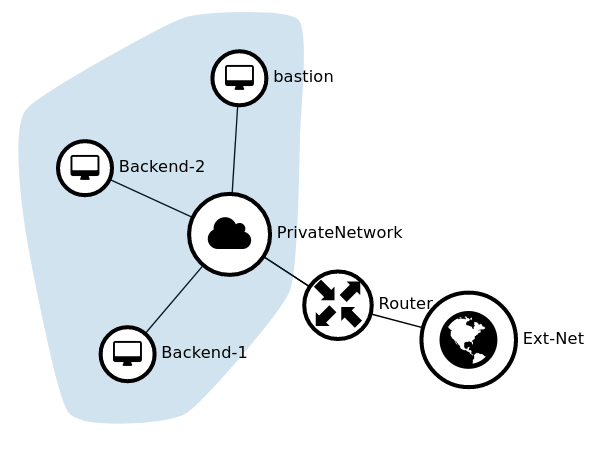
Load Balancer with a public IP (Public → Private)
We will be using the Load Balancer previously deployed in a private network and use an OpenStack Floating IP.
We will need to create a Floating IP address on the public network (Ext-Net), and then associate it to the Load Balancer's VIP port.
In order to use a Floating IP, we will need to create an L3 router and configure an external Gateway on it.
What is the role of a Floating IP?
Floating IP addresses are used in the OpenStack universe to expose resources (Neutron port) to the Internet. You can associate a Floating IP to a private network port only.
You can expose two types of resources:
- An instance with a private port
- An Load Balancer Virtual IP address (VIP)
Floating IP currently does not support IPv6.
You can read more about it on our dedicated Concepts page.
Step 1: Create the router
Step 2: Add an external Gateway on your router
Step 3: Attach the router to your Private Network
Step 4: Now we can create a Floating IP on the public network: Ext-Net
Step 5: Associate its ID to the Load Balancer's VIP address
Step 6: Using your Load Balancer with its public IP
Where to place the public Gateway
The public Gateway is defined by an L3 router attached to a private network with an external Gateway.
Delete the Load Balancer
Go further
Getting started with Load Balancer on Public Cloud
Official documentation of OpenStack Octavia
If you need training or technical assistance to implement our solutions, contact your sales representative or click on this link to get a quote and ask our Professional Services experts for assisting you on your specific use case of your project.
Join our community of users on https://community.ovh.com/en/.
Join our Discord to discuss with the OVHcloud team and other users.

