Installing Istio on OVHcloud Managed Kubernetes
291 Views
Istio is an open source service mesh and platform to reduce the complexity of deploying, securing, controlling and observing distributed services. As the Istio site explains, Istio helps you to:
- Control the flow of traffic between services
- Secure the services and manage the authentication, authorization and encryption of inter-service communications
- Apply and enforce policies on distributed services
- Monitor the services gathering metrics, logs and traces
This tutorial shows how to install Istio on a freshly created OVHcloud Managed Kubernetes Service cluster. You can use the Reset cluster function in the Public Cloud section of the OVHcloud Control Panel to reinitialize your cluster before following this tutorial.
Before you begin
This tutorial presupposes that you already have a working OVHcloud Managed Kubernetes cluster, and some basic knowledge of how to operate it. If you want to know more on those topics, refer to the deploying a Hello World application documentation.
Downloading Istio
Istio is installed in its own istio-system namespace and can manage services from all other namespaces.
1. Go to the Istio release page to download the installation file for your OS, or download and extract the latest release automatically (Linux or macOS):
2. Move to the Istio package directory. For example, if the package is istio-1.11.2:
The installation directory contains:
- Sample applications in
samples/ - The
istioctlclient binary in thebin/directory.
3. Add the istioctl client to your PATH environment variable, on a macOS or Linux system:
For the rest of the tutorial, please remain in this directory.
Installing Istio
This installation uses the istioctl command line tool that provides rich customization of the Istio control plane and of the sidecars for the Istio data plane. It has user input validation to help prevent installation errors and customization options to override any aspect of the configuration.
In this tutorial you're going to install Istio with the default profile, other profiles exist.
The istio-system namespace is created with all Istio components.
Installing Addons
Istio integrates several different telemetry applications. These can help you gain an understanding of the structure of your service mesh, display the topology of the mesh, and analyze the health of your mesh.
Use the following instructions to deploy the Kiali dashboard, along with Prometheus, Grafana, and Jaeger.
Install Kiali and the other addons and wait for them to be deployed:
Example output:
Verifying the installation
1. List the services in istio-system namespace using kubectl get services -n istio-system and ensure that the following services are deployed: istiod, istio-ingressgateway and the addons: grafana, jaeger, kiali, prometheus, tracing and zipkin.
Example output:
As the LoadBalancer creation is asynchronous, and the provisioning of the load balancer can take several minutes, you will surely get a pending for istio-ingressgateway EXTERNAL-IP field. Please try again in a few minutes to get the external URL to call your Istio.
2. List the pods in istio-system namespace using kubectl get pods -n istio-system and ensure that the following pods are deployed and all containers are up and running: istiod-*, istio-ingressgateway-* and the addons: grafana-*, jaeger-*, kiali-* and prometheus-*.
Example output:
Deploying an application
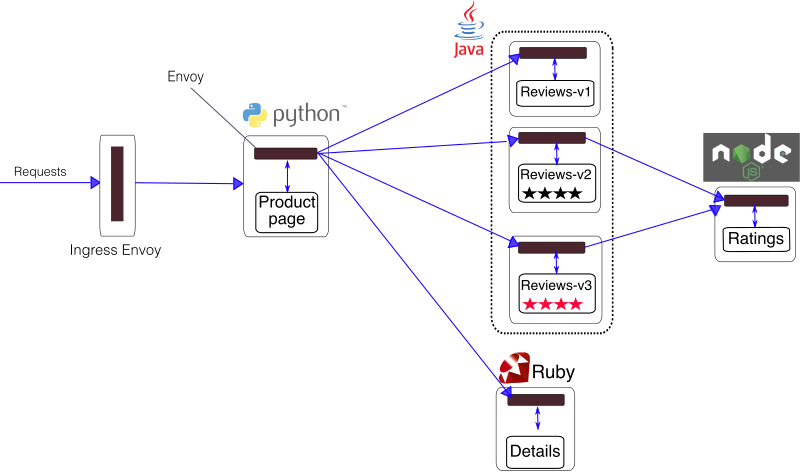
To verify that Istio is working in the cluster, deploy the Bookinfo test application — a multi-service microservices app that lets you verify Istio works as intended.
Installing Bookinfo
The Istio-Sidecar-injector, that you installed with Istio, will automatically inject Envoy containers into your application pods. The injector assumes the application pods are running in namespaces labeled with istio-injection=enabled.
Let's create and label an istio-apps namespace:
Then, add the istio-injection=enabled label:
Example output:
And now, deploy the bookinfo manifest into the namespace:
The above command installs and launches, in istio-apps namespace, all four microservices as illustrated in the above diagram: details, productpage, ratings and the three versions of reviews:
Now you can verify that all services and pods are correctly defined and running:
1. Use kubectl -n istio-apps get services to verify that the details, productpage, ratings and reviews services are up and running:
2. Use kubectl -n istio-apps get pods to verify that the details-v1-*, productpage-v1-*, ratings-v1-*, reviews-v1-*, reviews-v2-* and reviews-v3-* are up and running:
Example output:
As you can see, each pod has 2 containers, the app container and the Istio sidecar that is deployed with it.
Verify everything is working correctly up to this point. Run this command to see if the app is running inside the cluster and serving HTML pages by checking for the page title in the response:
Open the application to outside traffic
Now that the Bookinfo services are up and running, you need to make the application accessible from outside of your Kubernetes cluster, e.g., from a browser. An Istio Gateway is used for this purpose.
1. Associate this application with the Istio gateway:
2. Ensure that there are no issues with the configuration:
3. Confirm the gateway has been created:
Determining the ingress IP and port
Set GATEWAY_URL, the URL of the istio-gateway service.
You can get it with the following commands:
Confirm the app is running
To confirm that the Bookinfo application is running, run the following curl command:
You should get an HTTP status code 200 indicating that your productpage is OK.
You can also point your browser to http://<YOUR_GATEWAY_URL>/productpage (in my example to http://135.125.84.93:80/productpage) to view the Bookinfo web page. If you refresh the page several times, you should see different versions of reviews shown in productpage, presented in a round robin style (red stars, black stars, no stars), since we haven’t yet used Istio to control the version routing.

Visualize the traffic
With the Istio addons installed, you can access the Kiali dashboard. The following command will create a tunnel between the Kiali service and your machine and then open the dashboard link in your favorite browser:
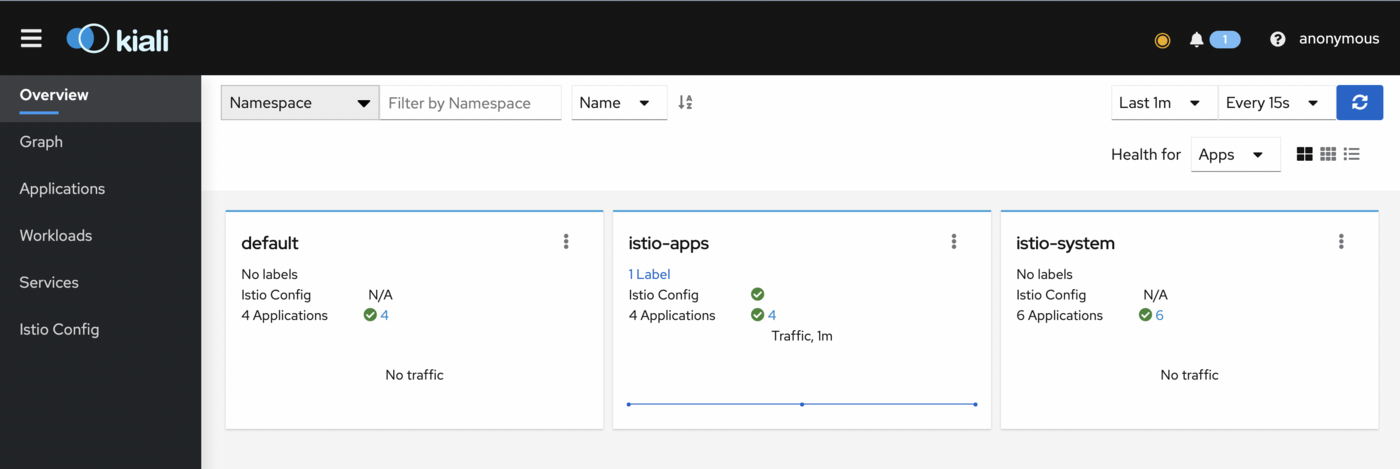
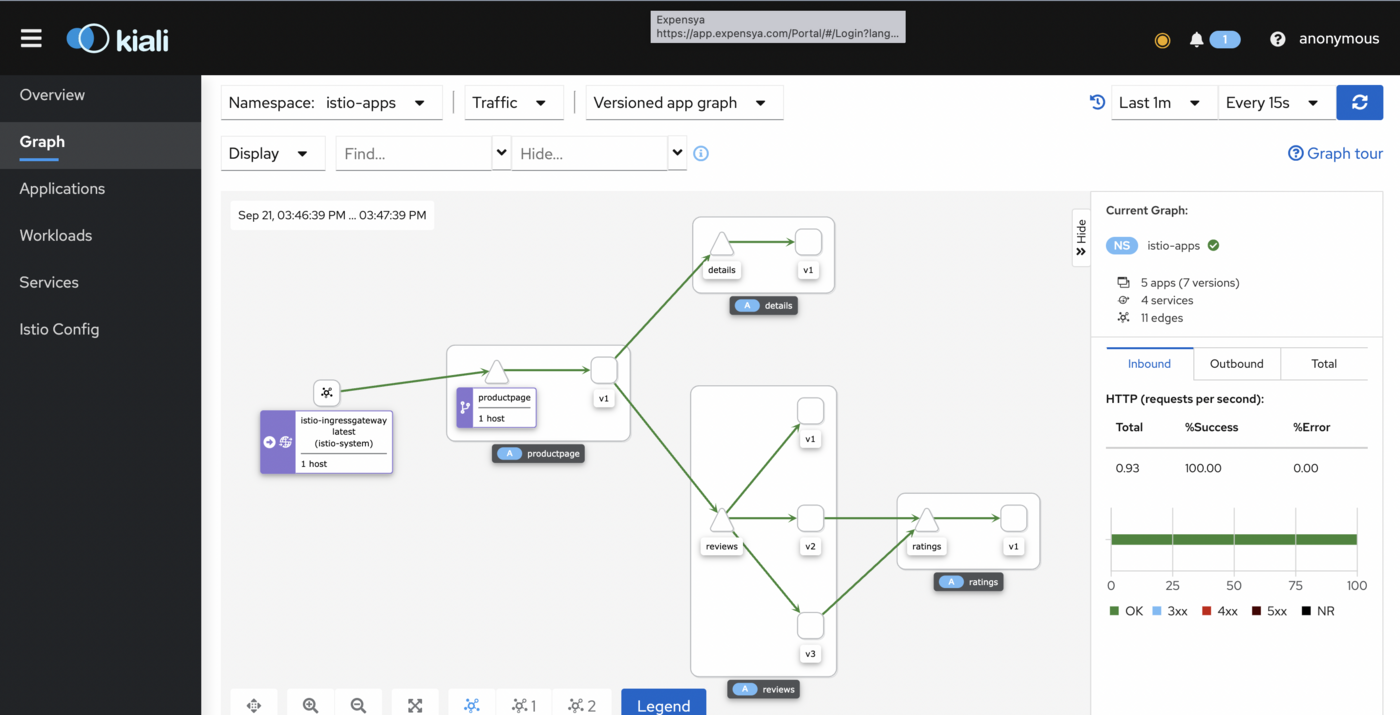
To view traffic, in the left navigation menu, select Graph and in the Namespace drop down, select istio-apps.
To see trace data, you must send requests to your service. To send 100 requests to the productpage service, use the following command:
for i in `seq 1 100`; do curl -s -o /dev/null "http://$GATEWAY_URL/productpage"; done
The Kiali dashboard shows an overview of your mesh with the relationships between the services in the Bookinfo sample application. It also provides filters to visualize the traffic flow.
What's next?
Now you have a working Bookinfo app deployed on Istio, you can follow the suggestions of the Bookinfo sample app page and use this sample to experiment with Istio’s features for traffic routing, fault injection, rate limiting, etc. To proceed, refer to one or more of the Istio Examples, depending on your interest. Intelligent Routing is a good place to start for beginners.
Cleanup
To uninstall the Bookinfo app, the easiest way is to use the provided cleanup.sh script:
To confirm the shutdown you can list the virtual services, destination rules, gateway and pods in the istio-apps namespace:
Example output:
Now you can uninstall Istio with istioctl command:
This command deletes the RBAC permissions and all resources hierarchically under the istio-system namespace. It is safe to ignore errors for non-existent resources because they may have been deleted hierarchically.
The istio-system namespace is not removed by default. If no longer needed, use the following command to remove it:
And remove istio-apps namespace:
Example output:
Go further
-
If you need training or technical assistance to implement our solutions, contact your sales representative or click on this link to get a quote and ask our Professional Services experts for assisting you on your specific use case of your project.
-
Join our community of users.

