How to use Terraform
524 Views
Objective
OpenStack is an open source cloud operating system for building and managing public and private cloud computing platforms. The OpenStack software components are the foundation of the OVHcloud Public Cloud infrastructure.
The open source tool Terraform was developed to make the creation of complex cloud infrastructures easier. It enables your infrastructure's properties to be abstracted in text files which can be used as a basis to deploy your infrastructure.
As an example, this video shows how to easily scale the number of instances while keeping your existing infrastructure by changing only one line of code:
This guide explains how to use Terraform with the Public Cloud by way of practical examples.
Requirements
- Configuring user access to Horizon
- Preparing an environment for using the OpenStack API
- Setting OpenStack environment variables
- Your OVHcloud API identifiers and authorisation key
- An SSH key
- Terraform OpenStack provider
- The OVHcloud Terraform provider
OVHcloud Control Panel Access
- Direct link: Public Cloud Projects
- Navigation path:
Public Cloud> Select your project
This tutorial is compatible with Terraform version 0.14.0 and later.
Instructions
Since the names of official images may change, it is best to use their IDs in your installation scripts.
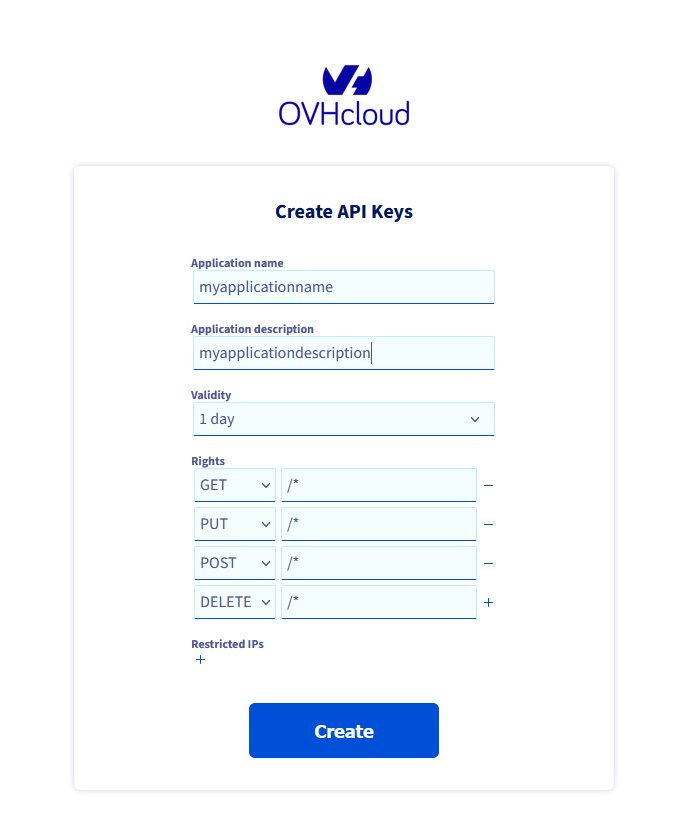
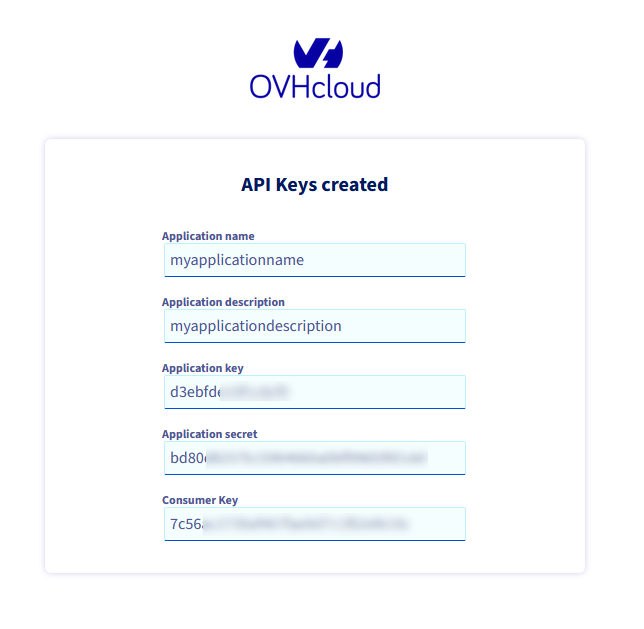
Token creation
Besides the API end-point, the required keys are the application_key, the application_secret, and the consumer_key. These keys can be generated via the OVHcloud token generation page.
Creating the Terraform environment
After the Terraform installation, create a directory for all text files that will describe your infrastructure:
You can now create a Terraform environment with the following command. This will allow you to create and manage the evolution of your infrastructure.
Creating resources
Creating a provider
In Terraform, you specify "providers" for your cloud environment. A "provider" (such as OVHcloud) hosts your OpenStack infrastructure resources.
Create a file named provider.tf with the following content:
If you don't want to define your secrets in the Terraform configuration file, you can also define them in environment variables:
The "alias" is a unique identifier for a provider. For example, if you have two OpenStack providers with different credentials, you must precise each provider in the resource.
You now need to create a new OpenStack user, then generate the OpenRC file containing all of the credentials you want to export as environment variables.
Load this file, then enter the password for the user you created earlier:
You now need to initialize your workspace in order to download the provider plugins:
Creating an instance
In Terraform, a "resource" is a component of your infrastructure. This can be an instance, a storage block, delivered by OpenStack provider or network delivered by the OVHcloud provider.
To create an instance, you need at least:
- An instance name
- An image
- A flavor
- An SSH key
For example purposes, we will create a simple instance on Debian 10 with the flavour d2-2, and import an SSH key. Add the following lines to a file named simple_instance.tf:
To see what will be added/created/deleted in your infrastructure, you can execute:
You can enter the following command to import your SSH key and create your first instance:
Output should be like this:
Click on Instances.
As you can see, your compute instance named "terraform_instance" is creating.
Note that creating a second, identical instance with terraform apply will not work.
Terraform applies change only if it recognises a difference in your configuration files or a new file.
Creating multiple instances
In this section, we will create an Ubuntu instance of the flavor "d2-2" in three different regions.
You can find all region names by checking this OVHcloud API endpoint:
We will use the following OVHcloud regions for this example:
- GRA11
- SBG5
- BHS5
You can create three resources named "openstack_compute_instance_v2" and change the region parameter for each. It can however become difficult to manage files with a large amount of identical resources.
A better method is to use the resource meta parameter called "count". It allows you to tell Terraform to create the same resource several times.
To do this, we will create a file named multiple_instance.tf. In it, we first define a variable containing the three regions, and then add an instance creation counter:
Check the changes you need to make to your infrastructure using the following command:
Apply your changes with the following command:
Terraform can create multiple instances with this method but you can use it to modify you current infrastructure as well.
Modifying an instance
In this example we will attach a new storage volume to our first instance. Open and edit the file named simple_instance.tf, then add the following lines:
Check the changes you need to make to your infrastructure using the following command:
Apply your changes with the following command:
Creating an instance in the OVHcloud network (vRack)
The Terraform OVHcloud plugin can manage private networks, private subnets, Public Cloud users and vRack attachments. In this part we will focus on the network creation.
Create a file create_private_network_instance.tf and enter the following:
This instance creation is linked to the openstack_compute_keypair_v2.test_keypair resource you created previsouly in this guide.
Check the changes you need to make to your infrastructure using the following command:
Apply your changes using the following command:
In your Public Cloud project, you will see a new instance appear, with a public and private interface.
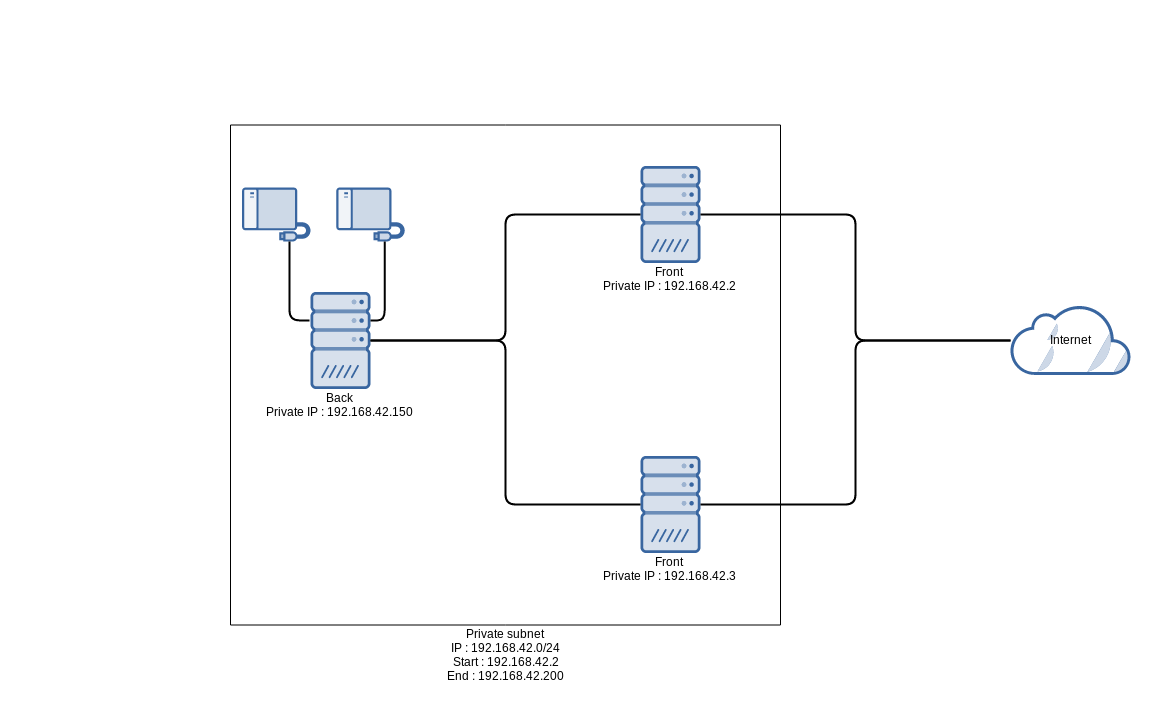
Creating an infrastructure for a web site
In this example, we will create a basic web site infrastructure using Terraform and the OVHcloud private network. The components created are:
- a private network
- a subnet
- two instances with two network interfaces each: the first one public and the second one private
- an instance with a private interface and two additional disks
Create a file named simple_web_site.tf and enter the following lines:
Check the changes you need to make to your infrastructure using the following command:
Apply your changes with the following command:
Creating a Public Cloud project
You can create an OVHcloud Public Cloud project programmatically using Terraform.
Before creating a project via Terraform, you must have created at least one Public Cloud project through the OVHcloud Control Panel.
This initial project creation is required to:
- Accept the Public Cloud Terms and Conditions
- Register and validate a payment method on your account
If this prerequisite is not met, the API will return the following error: "Found eligibility issues: challengePaymentMethod".
In this situation, project creation via Terraform is not possible.
To resolve this issue, you must:
- Create a Public Cloud project manually from the OVHcloud Control Panel
- Complete the payment method ownership verification process (the exact challenge depends on the payment method and account configuration)
Once this validation is completed, you will be able to create additional projects using Terraform.
Create a file named project.tf and enter the following lines:
Deleting an infrastructure
To remove every resource created through Terraform, you can enter the following command:
Go further
Join our community of users.

