Configuring an Additional IPv6 block in a vRack
396 Views
Objective
The vRack network serves as a global private network bridging various OVHcloud products, enabling the creation of sophisticated network solutions. Beyond facilitating private connections, it also supports routing public IP addresses.
This guide focuses on Additional IPv6 address block configuration within a vRack network.
vRack supports both IPv4 and IPv6 public routing with Additional IP address blocks. You can find the instructions on how to configure IPv4 blocks in this guide: Configuring an IP block in a vRack.
This guide focuses on Additional IP configuration over a vRack network. If you look for guidance on Additional IP configuration together with primary IP (on public network interface), read the following articles:
Introduction
IPv6 revolutionizes networking within OVHcloud's vRack by addressing IPv4's limitations and introducing features for the modern Internet. Its rollout is a direct response to the need for more extensive, secure, and sophisticated Internet architectures. Here are the key benefits of integrating IPv6 with vRack:
-
Flexibility for Advanced Networking: IPv6 significantly increases the address space, providing the flexibility needed to scale infrastructure, manage failover scenarios and support larger solutions. This ensures that networks can grow and adapt without the space constraints of IPv4.
-
Hierarchical Routing and Segmentation: IPv6 enables efficient hierarchical routing and logical infrastructure segmentation. This improves network manageability and security, ideal for reselling VMs with dedicated subnets or organising infrastructure into distinct segments.
-
Low latency: Native, end-to-end IPv6 connectivity can be an enabler for latency-sensitive services like media streaming, as many recent provider networks are built IPv6-native. In such networks, using IPv4 services brings additional latency (and costs).
By leveraging IPv6 within vRack, OVHcloud users can enjoy a more secure, efficient, and scalable network environment, ready to meet the demands of modern Internet usage.
Requirements
- A vRack service activated in your account
- A vRack compatible server attached to your vRack network
OVHcloud Control Panel Access
- Direct link: vRack
- Navigation path:
Network>vRack private network
This feature might be unavailable or limited on servers of the Eco product line.
Visit our comparison page for more information.
Instructions
Obtaining a new Additional IPv6 block
While requesting a new Additional IPv6 block, it's important to note that the allocation is regional. This means the IPv6 block you receive will be tied to a specific region, defining where public traffic enters your vRack network (thus, where the gateway is located).
Request a new Additional IPv6 block
You can order your new additional IPv6 block here.
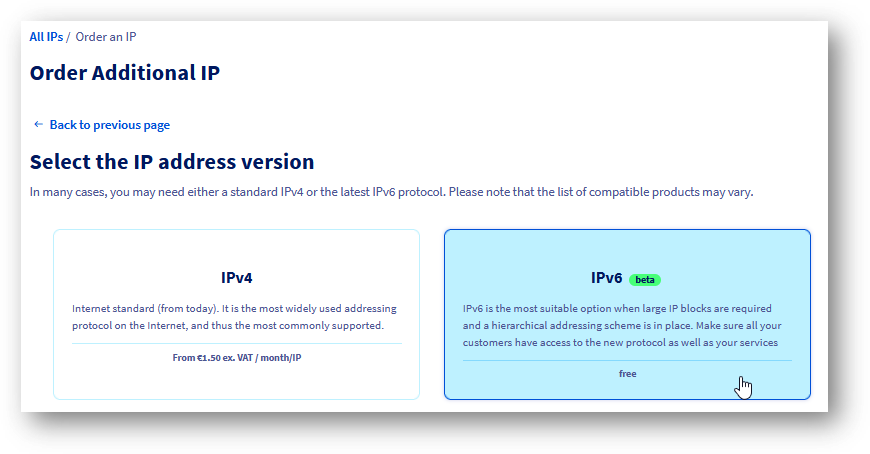
Next, follow the step-by-step instructions.
Your new Additional IPv6 will then be available on your vRack configuration page.
Configuring IPv6 in a vRack (basic mode)
In this section we will present basic IPv6 setup for your vRack connected hosts.
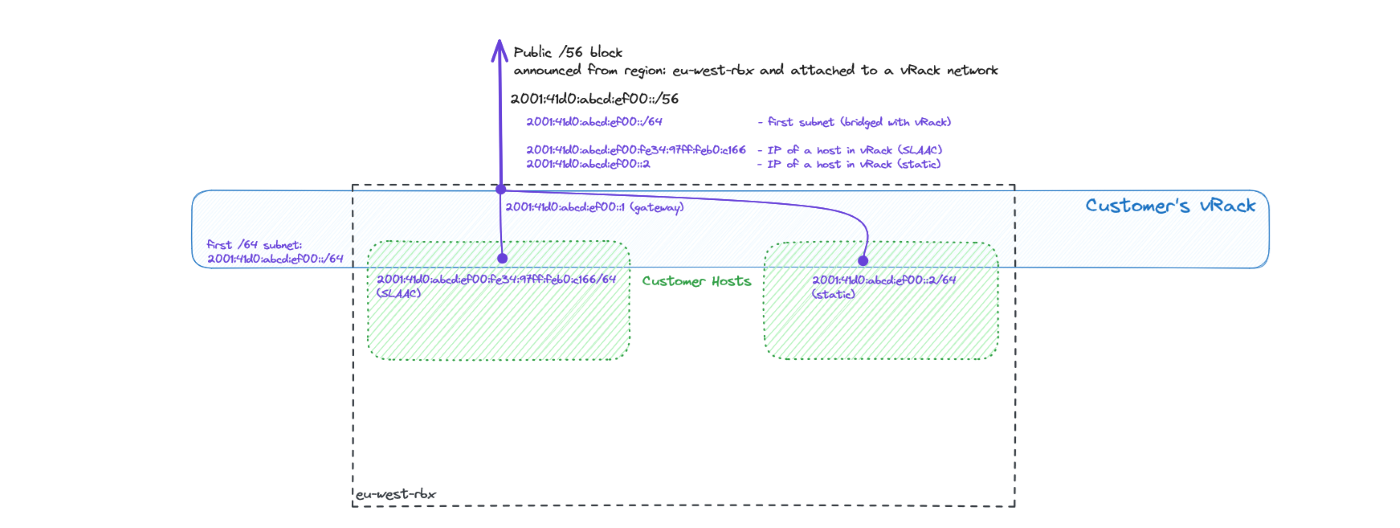
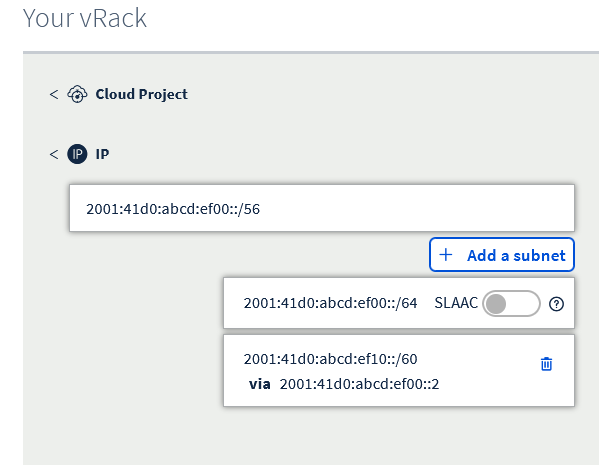
The example above shows two hosts with their vRack-side interfaces configured with IPv6 public addresses. One host is configured manually, while the other has an IP address assigned automatically using SLAAC. All IP addresses belong to the first /64 subnet from a given public /56 Additional IPv6 block. Both leverage the vRack interface for public IPv6 connectivity.
The default gateway for the first /64 subnet (bridged one) is the first address from the /56 block. In this example it is 2001:41d0:abcd:ef00::1. This is distributed via SLAAC but must be manually configured (as a default route) if SLAAC is disabled. See the Static IP configuration section below.
Via the OVHcloud Control Panel
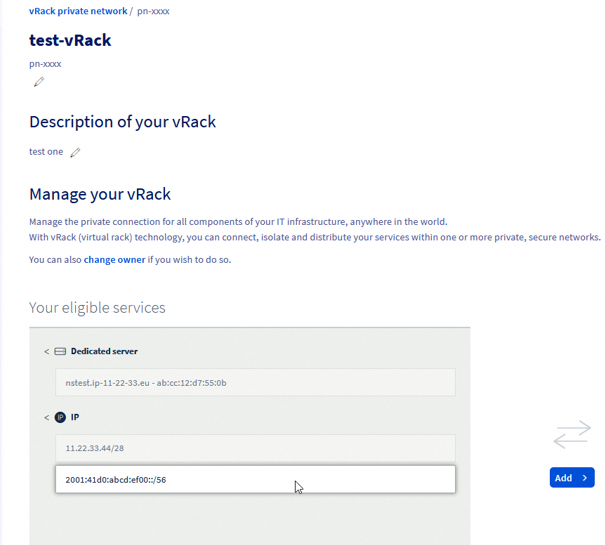
On the left side, the possible options (eligible services to be configured) are listed.
On the right you see what is already configured with your vRack.
Select your new Additional IPv6 and add it to your vRack.
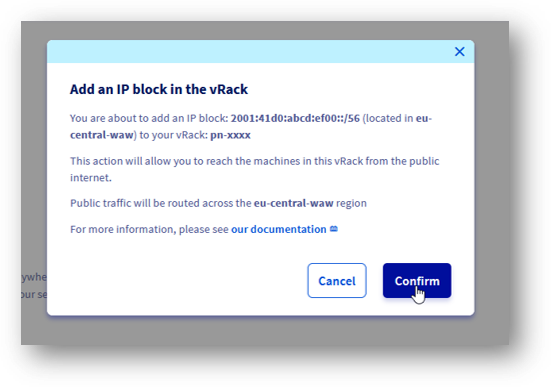
You now have your new Additional IPv6 added to your vRack.
Static IP configuration
Once the Additional IPv6 /56 block is attributed to a vRack network, there is still the first /64 subnet that is bridged with it.
This means you can easily use such IPs on your hosts with static IP configuration on vRack interfaces (see the next section for a host-side configuration example).
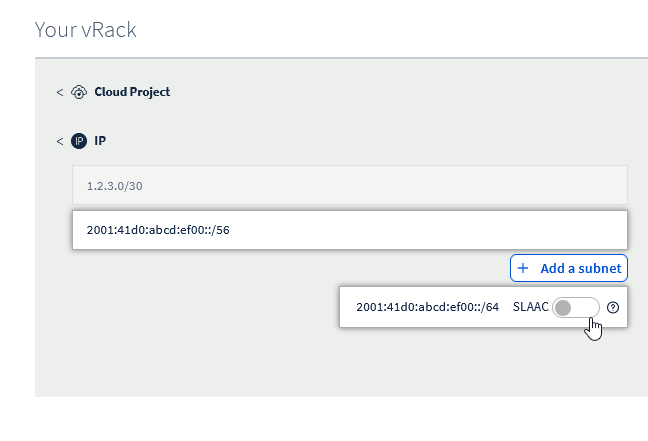
Automatic IP configuration (SLAAC)
To simplify IP addressing inside your network, you may want to use SLAAC. It can be enabled per-bridged-subnet only and can be enabled for the first /64 of your block (this one is always bridged) at any time using this slider button:

Don't forget to configure SLAAC on your host machine.
Via the APIv6 (alternative way)
Attributing an Additional IPv6 to a vRack
When you request an additional IPv6, it is automatically assigned to your vRack.
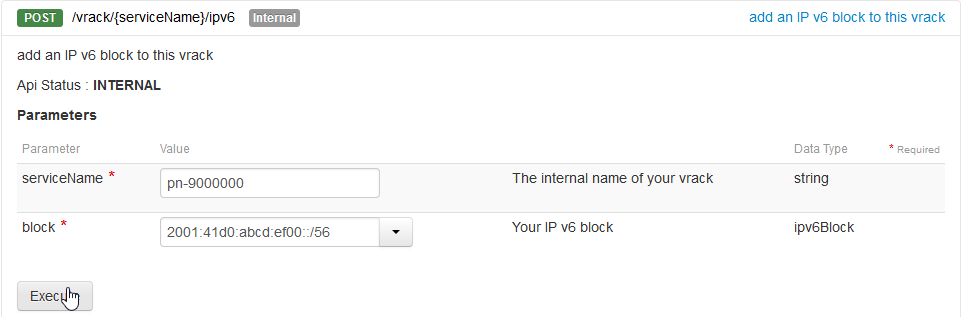
If you removed this new Additional IPv6 from your vRack, you can assign it again using this POST method:
As in the example below:
Use the following call to verify the IPv6 has been assigned:
As in the example below:
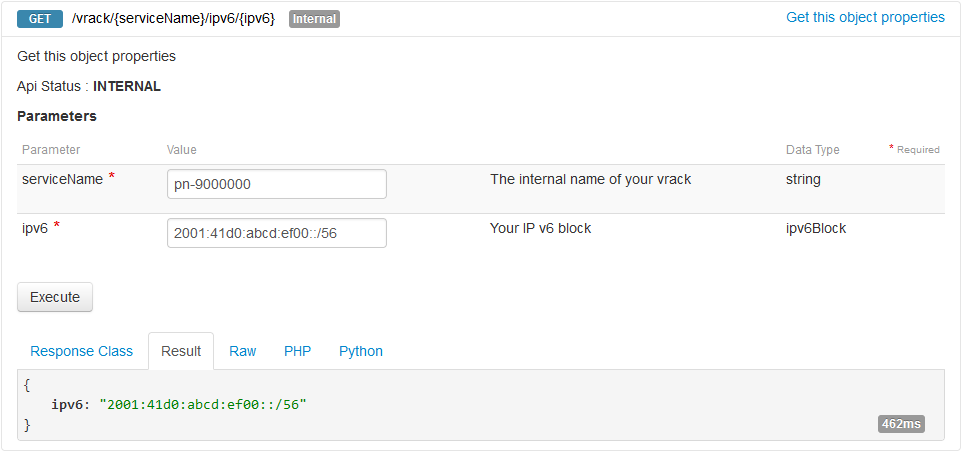
Now, we see our block configured with a vRack. The next step is to configure the host or VMs.
Static IP configuration
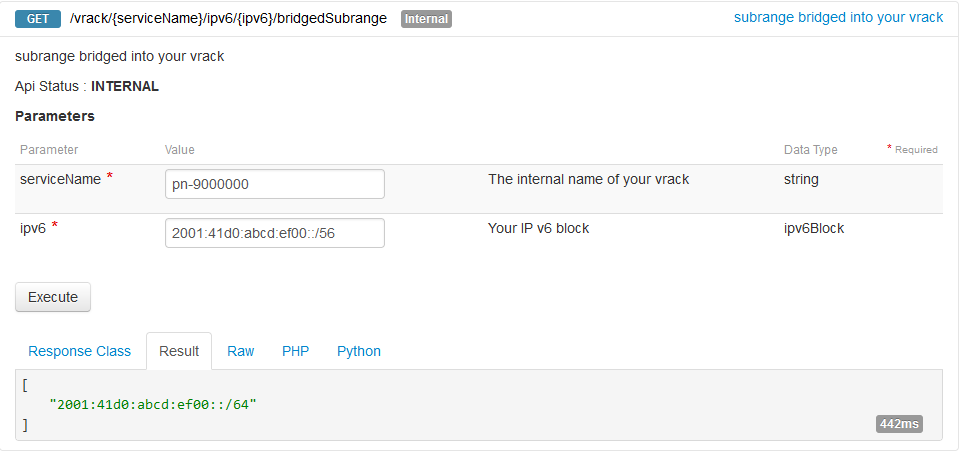
Once the Additional IPv6 /56 block is attributed to a vRack network, there is still the first /64 subnet that is bridged with it. This means you can easily use such IPs on your hosts.
Let's check exactly which subnet is bridged:
As in the example below:
To get more details, use this call:
As in the example below:
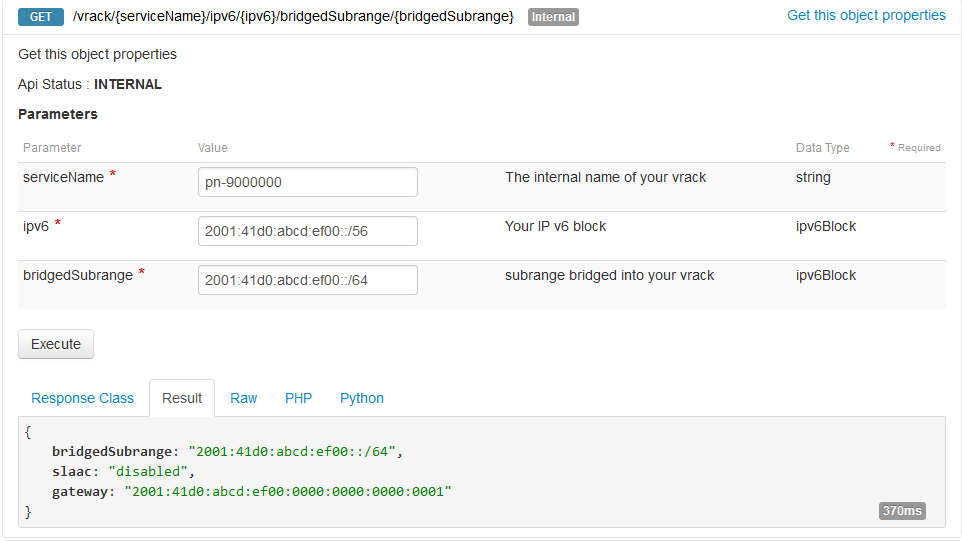
Notice that IP autoconfiguration (SLAAC) is turned off by default.
Automatic IP configuration (SLAAC)
To simplify IP addressing inside your network, you may want to use SLAAC. It can be enabled per-bridged-subnet only and can be enabled with this PUT method:
As in the example below:
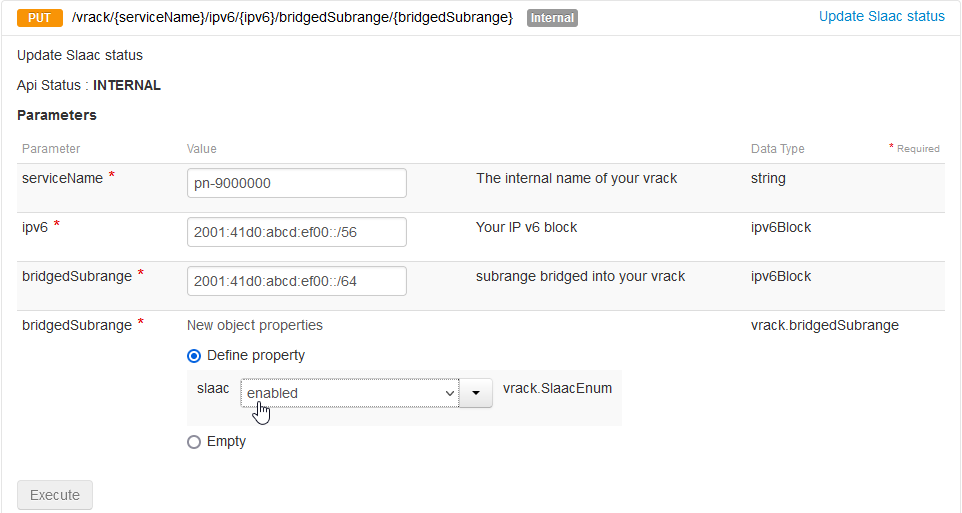
Don't forget to configure SLAAC on your host machine.
Managing public IP bandwidth on vRack
By default, Additional IP blocks routed via a vRack benefit from a standard public bandwidth of 5 Gbps in Europe/Canada/US and 100 Mbps in APAC regions. For a detailed overview of availability, please refer to public routing options on our vRack product page.
As infrastructure requirements scale, users may require broader bandwidth to support high-traffic public-oriented services, for which OVHcloud provides paid bandwidth options. Note that bandwidth options are applied per-vRack and per-region. Since Additional IP addresses are tied to a region, any bandwidth modification will affect all IP addresses (both IPv4 and IPv6) routed to the specific vRack within that particular region.
During the Additional IP ordering process
Choosing public bandwidth during an Additional IP order
The default public bandwidth can be changed when ordering a new Additional IP block with a vRack network as the backend.
To order a new Additional IPv6 block:
- Log in to the OVHcloud Control Panel.
- Open the
Networksection in the left-hand sidebar. - Select
Public IP addresses. - Click on the
Order IPsbutton, near the top of the page. - Select the IP version, then the vRack you want to attach your Additional IP to.
- Select the region you want your Additional IP to be in.
- Choose the public bandwidth you want to apply to your vRack for that specific region.
- Fill in the other options as necessary, then proceed with your order.
From the vRack management page
Modifying vRack public bandwidth on management page
For Additional IP blocks already attached to a vRack, bandwidth can be managed directly through the service configuration page.
To access the management interface:
- Open
Networkin the left-hand sidebar of your Control Panel. - Select
vRack private network. - In the "Public IP & bandwidth" column, click the
Managebutton for the corresponding vRack.
The management page is organized into two tabs:
- All attached services: For the time being, it redirects to the classic vRack management page. Soon, it will list all the products (Servers, Cloud Projects, etc.) currently linked to the vRack, in a new way.
- Public IP routing: Manages the public IP routing options of your vRack, including public bandwidth.
To modify the public bandwidth:
- Navigate to the
Public IP routingtab. - The interface displays individual management windows for each region (e.g.,
eu-west-par) associated with the vRack, listing all IP addresses attached to that specific region. - Within the window for the relevant region, click the
Modify bandwidthbutton. - Select the desired bandwidth option in the panel that appears on the right-hand side, then click
Proceed to orderto validate the order. - Once paid, the selected bandwidth should be available to your vRack in the chosen region after a few minutes.
Charges for the initial month are pro-rated based on the remaining days, with the full rate effective the next billing cycle.
The selected bandwidth upgrade will apply to all IP addresses in that region for the chosen vRack.
Host-side commands
Static IP configuration
In a basic configuration, you may want to setup an IP address and routing manually. This is also the suggested way when your machine acts as a router (see the configuring routed subnet section) and has ipv6.forwarding mode enabled.
First, let's add an IP address on the vRack interface (in our example "eth1"):
Please note that the first IP address in a block, 2001:41d0:abcd:ef00::1/64 is the gateway IP address and must not be used for host addressing.
Optionally, if you want to use the vRack interface as the main one for IPv6 traffic, the default route can be configured the following way:
Finally, bring up the interface (and verify the configured IP on it):
Automatic IP configuration (SLAAC)
To use automatic configuration, please ensure you have configured your interface as follows:
First, let's allow our host to accept Router Advertisements (for autoconfiguration) on the vRack interface (in our example "eth1"):
Note that this setting does not work if ipv6.forwarding is enabled in your system. In such case please refer to Automatic IP configuration for routed subnet for more details.
Then, simply bring up the interface:
After a moment (the configuration must propagate), specific IPv6 address (with the flags global and dynamic) should be visible on the interface.
Setup verification
Local
The most basic test is to ping a local IP address on a host:
Remote
Next, let's verify the connectivity from remote:
Configuring an IPv6 in a vRack for routed mode
In this section we will present a more advanced IPv6 setup, where your vRack connected hosts are acting as routers for hosted Virtual Machines. Such VMs have delegated subnets from the main IPv6 block (presented with an orange color in the schema below).
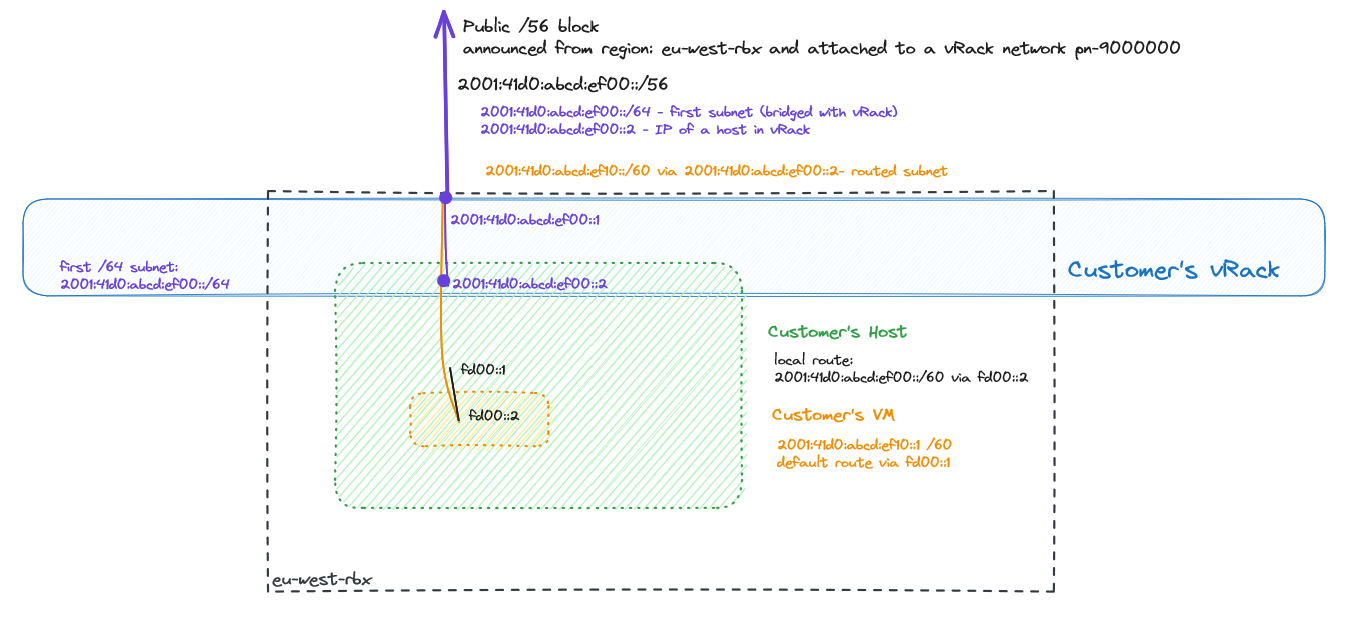
The traffic path is as follows: Inbound traffic to a given VM (with specified subnet) is routed through the customer's vRack, first to a specified host (with a next-hop address), then using a local link (or vSwitch - black link fd00::/64 on a diagram) to the particular VM. Traffic coming back from such a VM should use the default route via the first part of the local link (black one, fd00::1), then (possibly default) route from a host to its gateway.
For routed subnet definition any prefix size can be used between /57 and /64.
The default gateway for the host is the first address from the /56 block, which is in this example: 2001:41d0:abcd:ef00::1. The default gateway used by the VMs is the address of their host via the local link, which is fd00::1 in this example.
Define routed subnet
OVHcloud Control Panel actions
After adding Additional IP to your vRack you can manage routed subnet by clicking the Add subnet button.
To create a routed subnet, we must first define:
- subnet in CIDR notation (size between /57 and /64)
- next-hop address (so the host's IPv6 address)
Please note that a given subnet cannot overlap with any other subnet defined and next-hop address must belong to the first part (bridged /64 subnet) of your Additional IPv6 prefix.
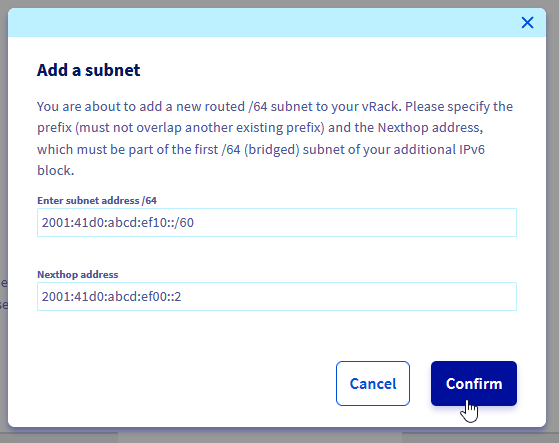
This created routed subnet 2001:41d0:abcd:ef10::/60 reachable via next hop 2001:41d0:abcd:ef00::2.
APIv6 commands
To create a routed subnet, we must first define:
- subnet in CIDR notation (size between /57 and /64)
- next-hop address (so the host's IPv6 address)
Please note that a given subnet cannot overlap with any other subnet defined and next-hop address must belong to the first part (bridged /64 subnet) of your Additional IPv6 prefix.
The example below shows how to define such a subnet:
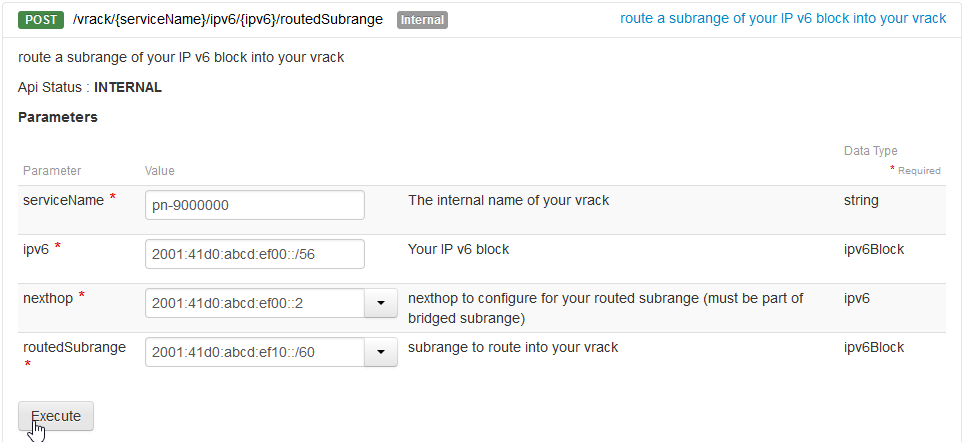
Here, we defined a routed subnet 2001:41d0:abcd:ef10::/60 which will be delegated to the VM hosted on: 2001:41d0:abcd:ef00::2.
Host-side configuration
Static IP configuration for a host (recommended)
When hosting Virtual Machines, we strongly recommend to use static configuration on your host.
Set up an IPv6 address, bring up the interface and (optionally) add the default route over the vRack interface:
Automatic IP configuration (SLAAC) for a host
In some cases, you may want to configure your interfaces with SLAAC and IP forwarding together.
Please note that this brings additional risks (such as losing access not only to the host but also to all VMs) and is not recommended.
Ensuring IPv6 forwarding is enabled:
Configuring Router Advertisements to be accepted (on vRack eth1 interface in our example):
Routed subnet configuration on a host and inside a VM
To ensure that our host knows what to do with packets addressed to the new routed subnet (that will be on a VM), we must add a specific route for it.
In our example this is the veth link with the address fd00::2/64 inside a VM we will use for routing.
Please note that this is very specific to the hypervisor installed (it can be vSwitch or veth interfaces). Please refer to the specific hypervisor networking guide for this setup.
Routed subnet configuration inside a VM
Again, please note that the link used between host and VMs is very specific to the hypervisor installed (it can be vSwitch or veth interfaces). Please refer to the specific hypervisor networking guide for this setup.
Add our routed IP block inside a VM to ensure it can accept packets:
Add the default route on a VM to ensure traffic can get back out of it:
Setup verification
Local, on a host
Ping from the host into the container (using local link):
Ping from the host into the container (using routed subnet):
Check the route to our /60 subnet on a host:
Local, on a VM
First, check the routing table:
Ping host link local interface:
Ping host global interface:
Finally, let's ping an external IPv6 from a VM:
Or, using a domain name:
From remote host
Let's check connectivity to our VM from outside the OVHcloud network:
And traceroute from a remote host (somewhere on the internet):
In this example:
- hop 10 - our host's IP address
- hop 11 - our VM's IP address
Multiple region locations vs. global vRack
OVHcloud's vRack technology enables organizations to connect servers across different locations as if they were located within the same data center. On the other hand, services like Additional IPv6 are regional, which means their functionality is linked to a particular location.
Below, an architecture is presented for learning purposes with two different regions and different Additional IPv6 blocks announced from each. Also, there is a host presented with IP addresses from both networks as well as a suboptimal route example - a host in one region addressed with IPv6 address announced in another region:
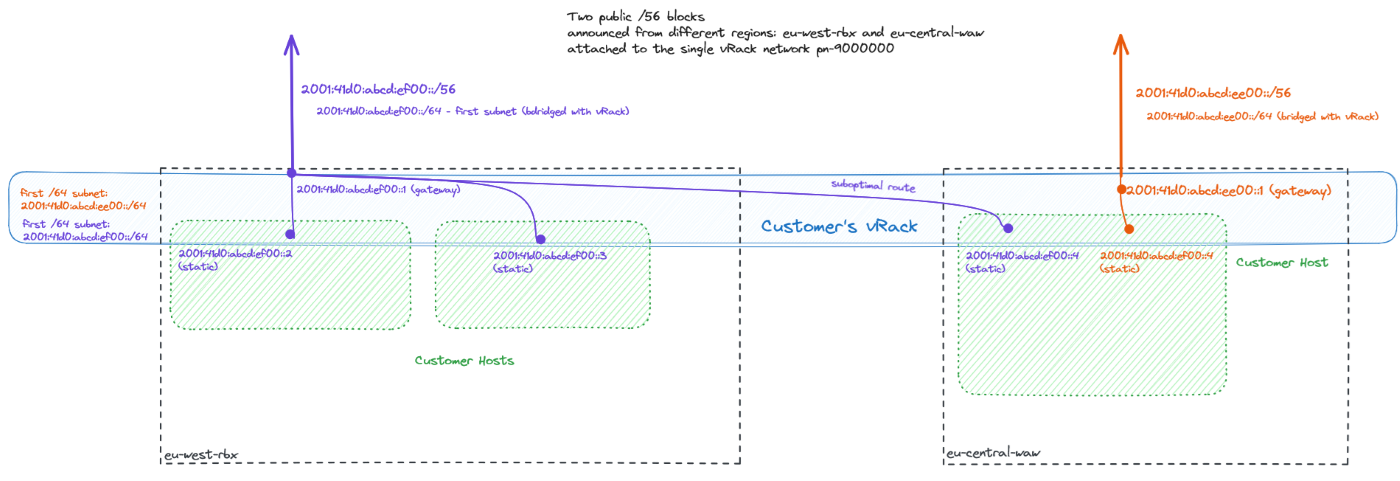
Please note that in such setups (with Additional IPv6 from more than single region) SLAAC must be turned off in the whole vRack (as this may lead to unpredictable results and losing connectivity randomly).
Benefits
- Enhanced Connectivity: By leveraging a vRack network together with public IP blocks routed in multiple locations, businesses can ensure seamless communication around the globe, regardless of backend server's physical locations.
- Move to cloud: vRack technology can be a great enabler of early steps toward a "move-to-cloud" organizational strategy, unblocking some legacy applications that still require local network communication.
Risks and Considerations
- No SLAAC support in multi-location setups: When there is more than one location acting in routing public IP traffic (both IPv4 and IPv6) into the same vRack, Stateless Address Autoconfiguration (SLAAC) should not be used. As an example of such situation, let's consider existing hosts using IPv4 addresses. Such hosts are becoming reconfigured automatically by SLAAC with IPv6 gateway set up from other region. Together with IPv6 prioritization over IPv4 by some Operating Systems this situation can lead to suboptimal routing or even total loss of connectivity for such hosts.
Known Limitations
Understanding the constraints of using Additional IPv6 within the vRack environment is crucial for effective network planning. Here are the key limitations to consider:
- Additional IPv6 goes only with vRack: Please note that Additional IPv6 addresses can only be configured with vRack-connected backends.
- SLAAC limitations in multi-location setups: Stateless Address Autoconfiguration (SLAAC) is not supported when there is public IP traffic (both IPv6 and IPv4) routed into vRack in multiple region locations.
- Up to 128 hosts inside bridged subnet: You can use up to 128 IP addresses directly on the vRack.
- Up to 128 next-hop routes: You can use up to 128 routes for routed subnets inside a vRack.
- Public bandwidth cap: Outbound traffic from OVHcloud to the Internet is capped at 5 Gbps per region location.
- IPv6 block allocation limits: Single Additional IPv6 block per vRack in a region location. Maximum of 3 blocks (/56) per region location.
- Mobility of Additional IPv6 blocks: Due to the hierarchical design of the IPv6 address space, Additional IPv6 blocks are region-specific. This means blocks cannot be transferred between regions, although they can be reassigned within any vRack-connected backend.
- No direct VLAN 802.1Q support in vRack by Additional IPv6: Configuration can only be done with native VLAN of your vRack network. For packet forwarding inside specific VLAN (of a vRack) a dedicated host on customer side will be needed.
- At the moment, routing Additional IPv6 into vRack is not supported in APAC (Asia-Pacific) regions.
Go further
Join our community of users.

