Uploading an ISO in a datastore
304 Ansichten
Objective
Find out how to manipulate data in a folder in your vSphere database.
Requirements
- Access to the OVHcloud Control Panel.
- You must be the technical administrator of the VMware on OVHcloud infrastructure.
- Ensure TCP port range 40050–40255 is open on your firewall to allow file uploads/downloads to the datastore.
- If you are using IAM, ensure that you have the rights, roles, and actions to upload files or create directories in the Datastore. For more information, please refer to our guide: IAM for VMware on OVHcloud - Overview and FAQ.
Instructions
This guide replaces the SFTP method, which is now deprecated.
Step 1 - Upload with HTML client
Access the datastore
Log in to the vSphere web interface, using the guide “Log in to the vSphere on OVHcloud web console” if necessary.
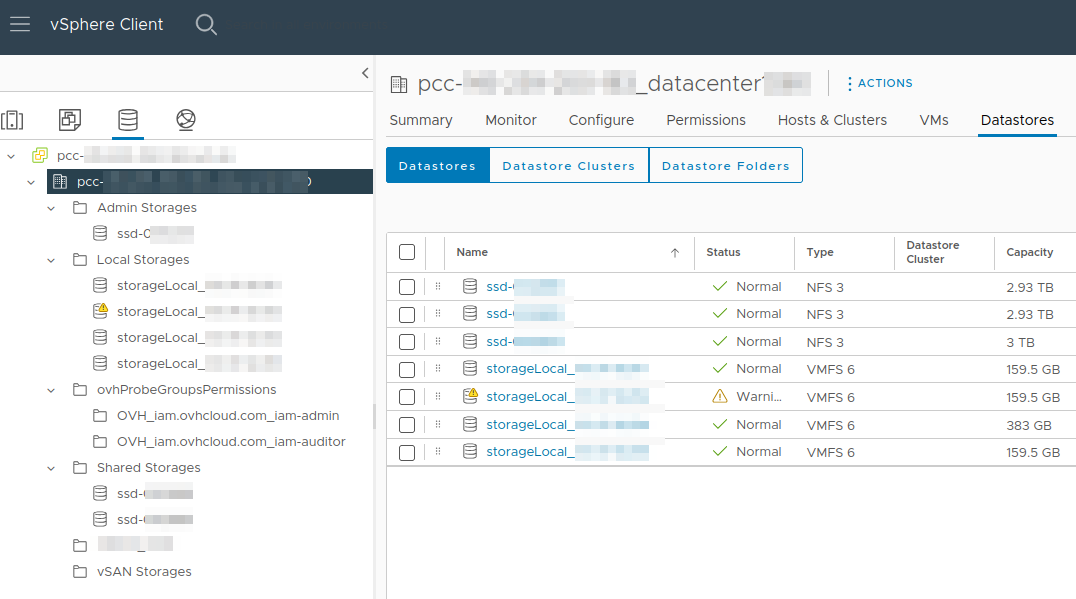
You then need to access the directories where you want to store your files (ISO, for example). The goal is to create a tree-view so that you can easily find your elements within your managed vSphere.
Upload files
There are two ways of accessing it, and you are free to choose the one that best suits you:
1. From the menu Inventory:
| Images | Steps |
|---|---|
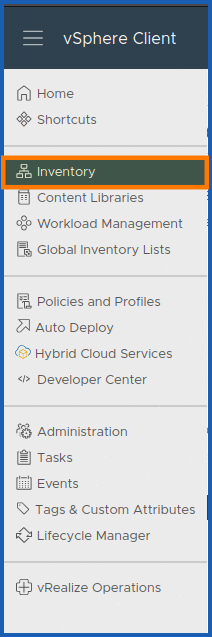 | - Click Inventory. |
  | - From pcc-XXX-XXX-XXX-XXX.ovh.XX, click Databases. |
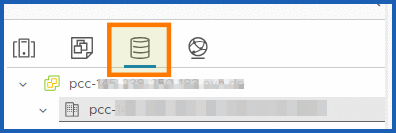
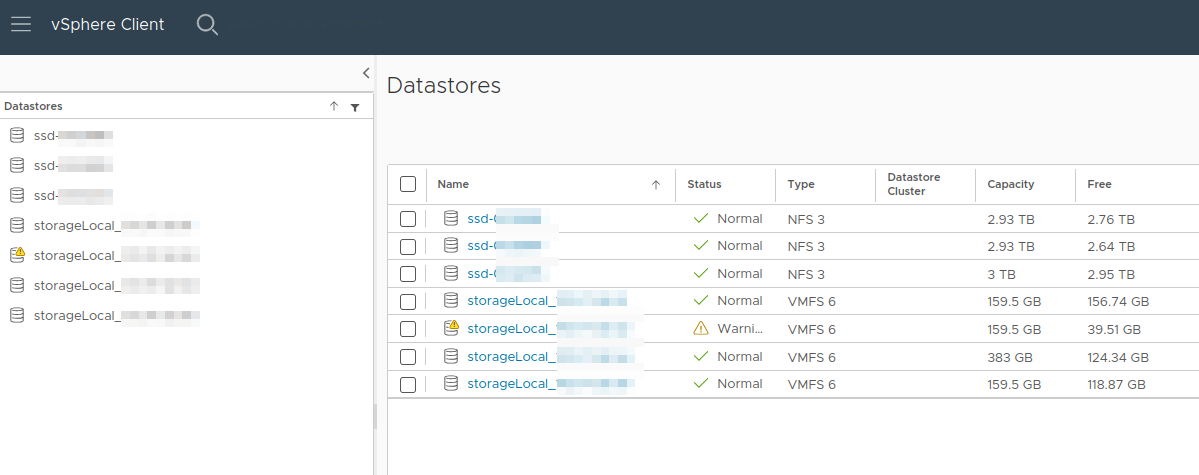
You will then find all of your datastores listed.
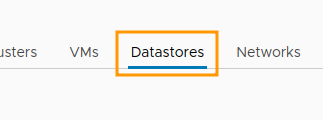
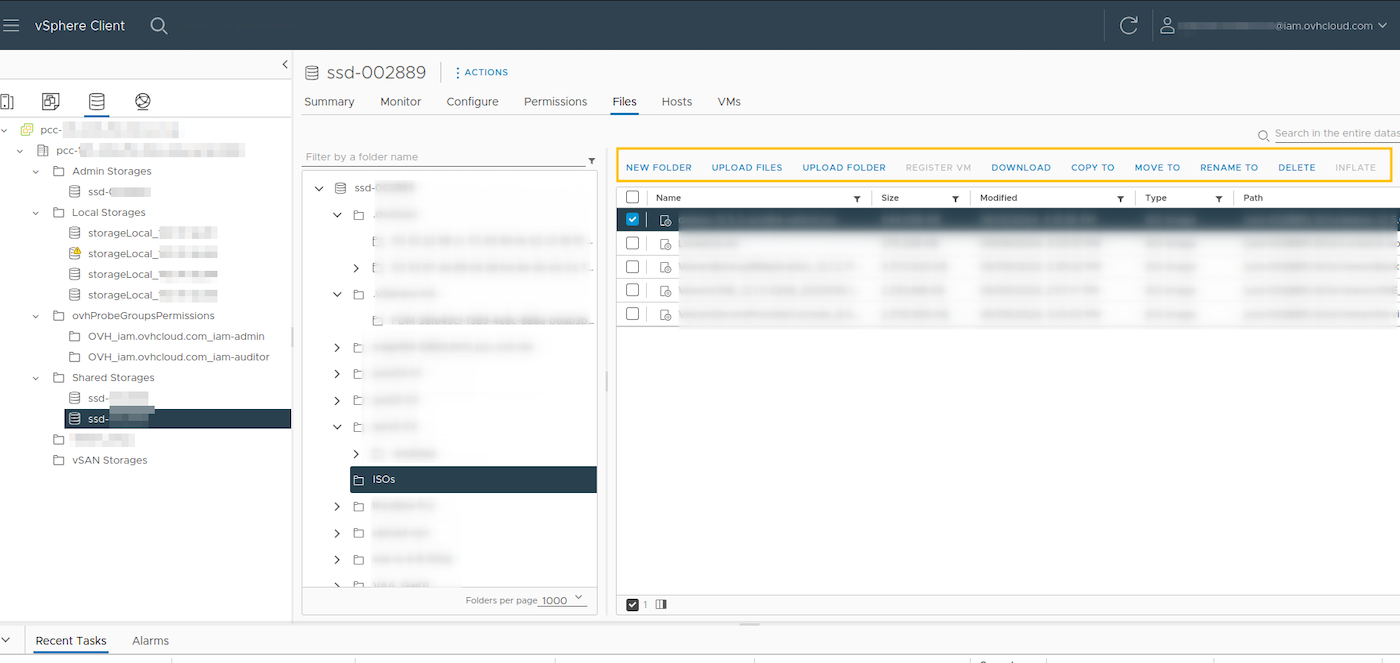
Click on your database to see a Files section in which your window will automatically open.
In the Files section of your open database, click DOWNLOAD FILES
Locate the item to upload from your local computer (e.g. a XXX.iso file) and click Open to upload the file (ISO or otherwise) from your machine connected to the vSphere HTML client.
The upload of the ISO file begins automatically without validation in the folder (if any) of your selected data store.
You can refresh the Data Store File Explorer to see the uploaded file in the list.
You can then launch this ISO file from a CD/DVD device within your VM, and launch the OS installation by following the installation process. However, it is recommended that you use OVHcloud deployment templates, or VM clones that have been transformed into templates (templates) by yourself.
2. From the menu Global Inventory Lists
This menu also links you to the Files upload interface:
| Images | Steps |
|---|---|
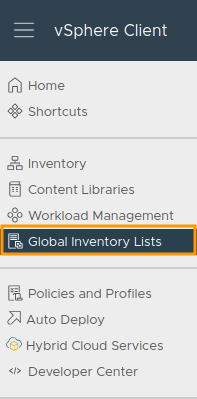 | - Click Global Inventory Lists. |
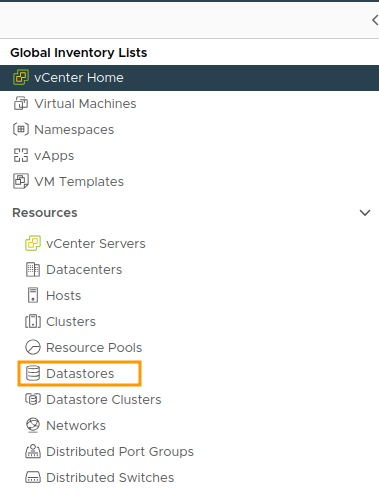 | - Then on Databases. |
Click on the desired Datastore.
You will find yourself in the Files section, where you can upload data to your database.
Then click DOWNLOAD FILES to select the file (ISO or other) to upload from your local machine.
Locate the item you want to upload from your local computer (e.g. file XXX.iso) and click Open
Upload folders
From your database, in the Files section, click DOWNLOAD A FOLDER.
Locate the item to upload from your machine connected to the vSphere HTML client and click Open
Upload will not start until you confirm:
| Images | Steps |
|---|---|
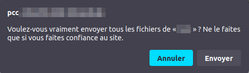 | - To confirm, click Send. |
Move/Copy files
From your database, click MOVE TO or COPY TO.
Locate the destination item to move from the database and click OK.
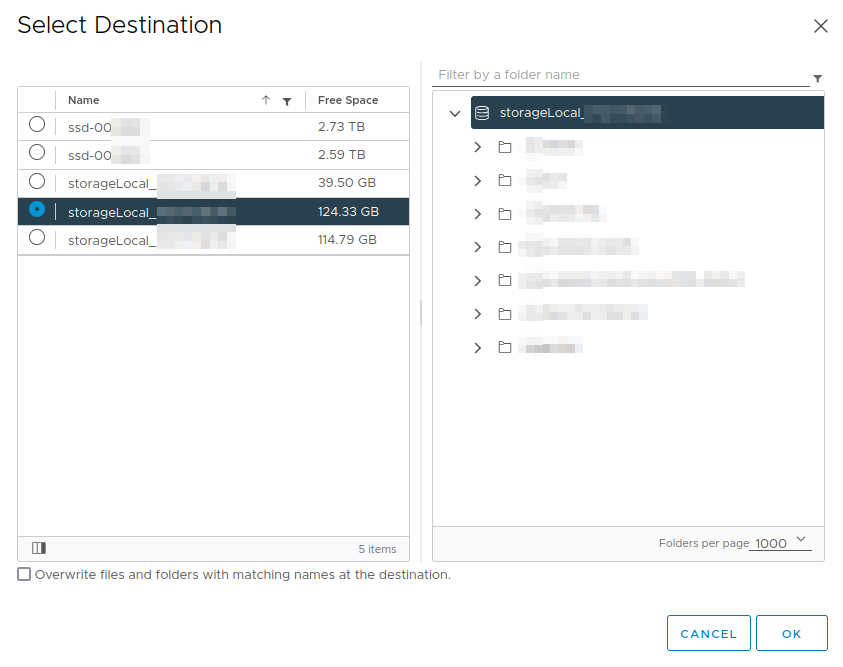
You must have sufficient rights to perform these actions.
Rename files
From your database, click Replace name with.
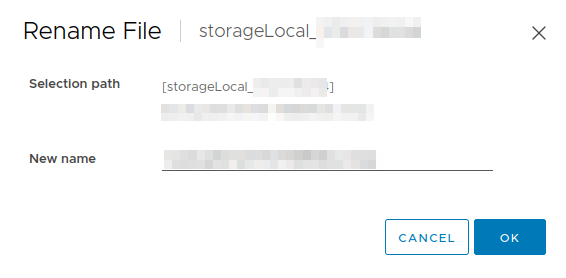
Rename your file, then click OK.
Create a folder (optional)
In the Files section of your database, click NEW FOLDER to create a folder to store your files.
Name your folder and click OK.
Step 2 - Upload with Govc
A GB library for interacting with VMware vSphere APIs (ESXi and/or vCenter Server) is provided by VMware. You can read the READ ME of the Github repository at this url
In addition to the vSphere API client, this repository includes:
These are the environment variables that will be required to configure Govc authentication with the VMware api:
| Environment variable | Standard | Advanced/Premium (NSX + vSAN) | Comments |
|---|---|---|---|
GOVC_DATACENTER | pcc-XXX-XX-XX-XX_datacenterXXXX | pcc-XXX-XX-XX-XX_datacenterXXXX | - The name of the default datacentre in the VMWare sense. |
GOVC_USERNAME | uname | uname | - The local VMware vSphere on OVHcloud connection user. You can omit this variable if you specify your credentials in the GOVC-URL variable. |
GOVC_PASSWORD | p4sswor_DXXXXXx | p4sswor_DXXXXXx | - The login password for the local VMware vSphere on OVHcloud user. You can omit this variable if you specify your credentials in the GOVC-URL variable. |
GOVC_URL | user:pass@hostvsphere.localvc.localpcc-XXX-XX-XX-XX.ovh.XX | user:pass@hostvsphere.localvc.localpcc-XXX-XX-XX-XX.ovh.XX | - The IP or hostname of the VMware vSphere on OVHcloud host. You can also specify the user ID and password, such as user:pass@host. And you pass variables GOVC_USERNAME/PASSWORD. Warning: the host defines the IP of your ESX and not the pcc-XXX-XXX-XXX-XXX. If you use govc within a VM in your environment, you can add in host: vsphere.local or vc.local. |
GOVC_DATASTORE | ssd-XXXXXXnfs-XXXXXX | ssd-XXXXXXnfs-XXXXXXvsanDatastore | - The default datastore in the VMWare sense. |
GOVC_NETWORK | 172.XX.XX.XX | 172.XX.XX.XX | - The default network in the VMWare sense. You can find them in your global inventory Networks. |
GOVC_HOST | 172.XX.XX.XX | 172.XX.XX.XX | - The default host in the VMWare sense. You can find them in your global inventory Hosts. |
GOVC_RESOURCE_POOL | ovhServer | ovhServer | - The default resource pool in the VMWare sense. You can find them in your global inventory Resource Pools. |
HTTP_PROXY | http://XXX.XX.XX.XX:XXXXX | http://XXX.XX.XX.XX:XXXXX | - The URL of your proxy server without https. |
HTTPS_PROXY | https://XXX.XX.XX.XX:XXXXX | https://XXX.XX.XX.XX:XXXXX | - The URL of your proxy server with https. |
Installation
With the binary:
You can download the binary from the official VMware Github repository assets: https://github.com/vmware/govmomi/releases
The Curl below automatically chooses the correct version needed for your operating system (uname) and downloads the binary in compressed version tar.gz.
You must have access to the internet to download it, otherwise the curl will not work. If you do not have a curl, tar and uname. Install them before launching the command by running this command:
Depending on the operating system: Ubuntu/debian -> apt, Redhat/Centos -> yum/dnf.
Choose the installer you want.
Be careful to download the Govc asset, which has the correct version of the operating system you are using (Windows/Linux, Debian/Freebsd, x64_86/arm, arm/arm64, etc.).
We also advise you to check the sum of the hash downloaded.
Note: You must be root to run tar or have sufficient sudo rights. Depending on the rights of the user used on your operating system, you must also add the execution rights on the Govc binary, for example.
With go install :
With Docker:
A Docker image can be a good way to run the Govc binary in a versioned, isolated way.
The official VMware Docker image govc is built from this Dockerfile.
Example of Docker govc image execution with environment variables see concepts in the rest of the documentation.
For alternative installations, check out the official VMware Git Govc repository at this URL.
Configuration/Authentication
The program provides a wide range of arguments for defining the conditions for accessing the API (e.g. its URL, user/password, etc.). However, we recommend using environment variables to manage your clusters more efficiently, especially if you need to connect to several APIs. They can also be placed in a file for reuse during another session, for example.
Here is a configuration example for a Linux OS. Remember to create your govc.env file in the root of the folder where you launch the binary.
As with any file containing variables, you just need to source it from a terminal.
At the launch of each command, options can be modified on the fly to overload the environment variables, for example:
Please note that if you use the debug command (the “=true” is optional, as it is a Go flag), a hidden folder `.govmomi/debug” will be created, with logs you can use to trace your problem.
Usage
We will show you the Govc datastore.upload upload command here.
First of all, it is important to understand that within a datacentre, objects are grouped in the same type, under VM, Network, Host and Datastore. Thus, there is only one method for uploading files with the command govc datastore.upload.
Download + Upload :
Here is an example of uploading an ISO image with govc. Be sure to locate the folder to which you want to import your ISO, if you have one:
Download an ISO with curl before uploading it using a shell pipe:
Govc has a large number of commands to call the VMware API to manage your managed resources. Please see the full list in the official documentation.
Installation
Since 2017 Curl and bsdtar -> tar are installed by default, so you can run the command below with Powershell, CMD or the prompt you prefer.
With Powershell :
You can install the Govc binary with Powershell by running the command below:
If you prefer, you can simply unzip the following Govc Windows asset (x86_64.zip) after downloading it at the following URL: https://github.com/vmware/govmomi/releases/download/v0.43.0/govc_Windows_x86_64.zip
With Chocolatey :
You can use the official Powershell Chocolatey repository, however we recommend the most recent version on the VMware Github repository (above).
jq allows you to list Govc returns correctly in Powershell.
Configuration/Authentication
With Powershell :
There are several ways to configure environment variables with Windows and Powershell, here are some examples (see the comments for each command and powershell variable).
There are several ways to make Govc work with Windows, powershell being the most well-known. But there is an alternative solution, Windows has implemented WSL 2 (Windows subsystem for Linux) which can be a good alternative to simplify the configuration.
Usage
Upload:
To upload an ISO with powershell and Govc, use the Govc datastore.upload argument
Download + Upload :
Govc has a large number of commands to call the VMware API to manage your managed resources. Please see the full list in the official documentation.
Go further
If you require training or technical support to implement our solutions, please contact your Technical Account Manager or visit this page to get a quote and request a custom analysis of your project from our Professional Services team experts.
Ask questions, give your feedback and interact directly with the team building our Hosted Private Cloud services on the dedicated Discord channel.
Join our OVHcloud user community.

