AI Training - Tutorial - Get started with NVIDIA Triton Inference Server and AI Training
498 Ansichten
Objective
Triton Inference Server from NVIDIA allows you to streamline and standardize AI inference.
Triton enables users to deploy, run and scale trained AI models from any framework and on any type of resources: GPU or CPU. It also allows developers to deliver high-performance inference in the Cloud.
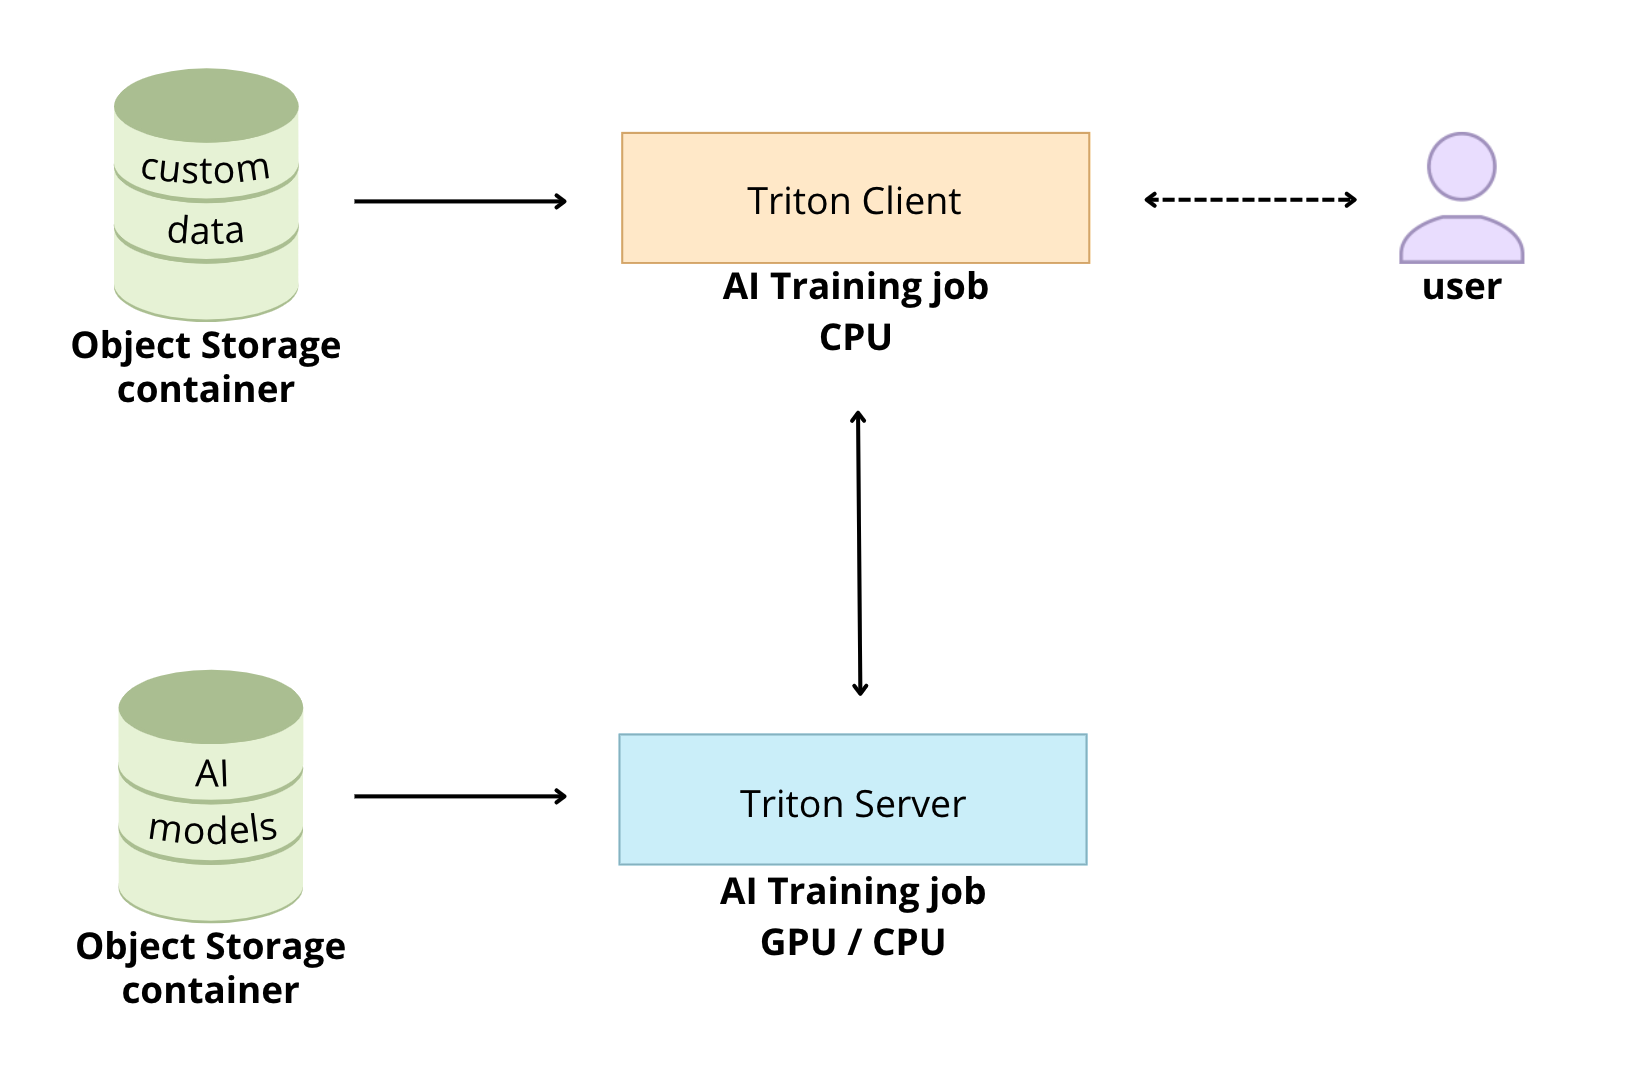
The goal of this tutorial is to see how it is possible to deploy Triton Inference Server easily thanks to the OVHcloud AI Training tool.
Requirements
- Access to the OVHcloud Control Panel
- ovhai CLI installed
- An AI Training project created inside a Public Cloud project in your OVHcloud account
- A user for AI Training
- Docker installed on your local computer or on a Virtual Machine
- Some knowledge about Docker images and Dockerfile
- Some basics on NVIDIA Triton Inference Server
Instructions
Create the model repository
The model repository is the directory in which you place the AI models you want Triton Inference Server to serve.
Custom models
Triton Inference Sever allows you to deploy several models from multiple Deep Learning and Machine Learning frameworks. For example, Triton Inference Server can serve the following model formats: TensorRT, TensorFlow, PyTorch, ONNX, ...
Follow the NVIDIA Triton Inference Server user guide to know more about the capabilities.
To use custom AI models, the directories and files that compose a model repository must follow a required layout.
Find more information on how to use custom models with Triton in this documentation.
An example model repository is included in the docs/examples/model_repository.
We will use these models already trained in this tutorial.
Sample models
First of all, you have to clone locally the Triton Inference Server GitHub repository.
In this command, specify also the version of Triton you are interested in. For this example, we will use the r23.03.
Clone the GitHub repository:
Before using the repository, you have to fetch any missing model definition files from their public model zoos via the provided script: fetch_models.sh.
The following models will be downloaded:
- densenet_onnx
- inception_graphdef
- simple
- simple_dyna_sequence
- simple_identity
- simple_int8
- simple_sequence
- simple_string
Check the content and architecture of your model repository with the tree command:
You should get:
Upload the models to an Object Storage container
To upload the models to an OVHcloud Object Storage container, you can use the ovhai CLI.
Warning! In order to use Triton Inference Server, you must ensure that your model repository is correctly architected. For example, keep the empty directories, they are necessary for the proper functioning.
Once your models have been uploaded, check that all your models are available:
You should obtain:
Launch Triton Inference Server with AI Training
Triton is optimized to provide the best inferencing performance by using GPUs. In this tutorial, it will be running with one GPU thanks to the OVHcloud AI Training tool.
First of all, pull the Triton Inference Server Docker image from the NGC repository. In this tutorial, we will use the 23.03-py3 container version.
Customize the Triton Inference Server Docker image for OVHcloud AI Tools
To make Triton Inference Server image compatible with AI Training, you have to rebuild the image by giving the OVHcloud user rights on the /workspace content.
For more information on how to build Docker images compatible with OVHcloud AI solutions, please refer to this documentation.
Create the Dockerfile
Your Dockerfile should start with the FROM instruction indicating the parent image to use. In our case we choose to start from the FROM nvcr.io/nvidia/tritonserver:23.03-py3 pulled image:
Create the home directory and copy your files to it:
Give correct access rights to the OVHcloud user (42420:42420):
Don't forget the --user=42420:42420 argument if you want to simulate the exact same behaviour that will occur on AI Training jobs. It executes the Docker container as the specific OVHcloud user (user 42420:42420).
Find the complete Dockerfile below:
Build the Docker image from the Dockerfile
From the directory containing your Dockerfile, run one of the following commands to build your application image:
-
The first command builds the image using your system’s default architecture. This may work if your machine already uses the
linux/amd64architecture, which is required to run containers with our AI products. However, on systems with a different architecture (e.g.ARM64onApple Silicon), the resulting image will not be compatible and cannot be deployed. -
The second command explicitly targets the
linux/AMD64architecture to ensure compatibility with our AI services. This requiresbuildx, which is not installed by default. If you haven’t usedbuildxbefore, you can install it by running:docker buildx install
The dot . argument indicates that your build context (place of the Dockerfile and other needed files) is the current directory.
The -t argument allows you to choose the identifier to give to your image. Usually image identifiers are composed of a name and a version tag <name>:<version>. For this example we chose triton-inference-server:23.03-py3.
Push the server image into the shared registry
The shared registry of AI Training should only be used for testing purposes. Please consider attaching your own registry. More information about this can be found here. The images pushed to this registry are for AI Tools workloads only, and will not be accessible for external uses.
Find the address of your shared registry by launching this command:
Log in on the shared registry with your usual AI Platform user credentials:
Push the compiled image into the shared registry:
Launch Triton Inference Server in a dedicated job
Triton Inference Server exposes both HTTP/REST and gRPC endpoints. Therefore, clients can communicate with Triton using either an HTTP/REST and GRPC protocols.
Launch Triton Inference Server with OVHcloud AI Training tool to benefit from the GPU power:
So that the client can communicate with the Triton Inference Server, you must retrieve the server job IP and URL.
If necessary, install jq as follows:
To get the server job url, run the following command:
You can verify that Triton Inference Server is running properly.
Then, you can get the server job ip:
Send inference requests
First, you have to use a docker pull to get the client libraries and examples image from NGC.
In the following example, we'll use densenet, an image classification model. We'll see the results obtained on the following image:

Test it locally (optional)
Then, test the densenet_onnx model on the example image.
To test it locally, you have to specify the server_job_url to be able to send http requests.You can get it by using the following command:
ovhai job get <job_id> -o json | jq '.status.url' -r
You should obtain the following result:
Customize the Triton client Docker image for OVHcloud AI Tools
Here, the method is exactly the same as the one used previously for the Triton server. Refer to the part concerning Triton server Docker image for more details.
Create the Dockerfile
Build the Docker image from the Dockerfile
Launch the following command from the Dockerfile directory to build your application image:
Push the client image into the shared registry
Push the compiled image into the shared registry:
Launch a Triton Client job for inference
Run the example image client inside an AI Training job to perform image classification using the example densenet_onnx model.
To be able to classify your own images, you can create an Object Container in the OVHcloud Object Storage and add your images there:
In this example, we add the image dog.jpg into the bucket.
To send a request for the densenet_onnx model, use an image from the /workspace/images directory. In this case we ask for the top 3 classifications.
HTTP/REST protocol
You just have to use the -u flag to point at the gRPC endpoint on Triton. The inference server URL will be your server job URL.
You should have obtained this server job IP when launching the Triton Inference Server with AI Training in the step Launch Triton Server in a dedicated job.
You have to specify the port 8000 if you want to use the HTTP/REST protocol.
Launch the inference job for HTTP protocol:
Once your job is RUNNING, check the logs to obtain the results of the classification.
You should obtain something like that:
gRPC protocol
If you want to use the gRPC protocol by providing the -i flag, you must also use the -u flag to point at the gRPC endpoint on Triton. The inference server URL will be your server job IP.
You should have obtained this server job IP when launching the Triton Inference Server with AI Training in the step Launch Triton Server in a dedicated job.
You have to specify the port 8001 if you want to use the gRPC protocol.
Launch the inference job for gRPC protocol:
Once your job is RUNNING, check the logs to obtain the results of the classification.
You should get the following result:
Go further
- To go further with Triton Inference Server and OVHcloud AI Tools, you can follow these tutorials.
Feedback
Please send us your questions, feedback and suggestions to improve the service:
- On the OVHcloud Discord server

