Setting up an IPsec Tunnel with NSX
547 Ansichten
Objective
Learn how to configure an IPsec tunnel with NSX.
OVHcloud provides you with services for which you are responsible for configuration, management, and liability. It is your responsibility to ensure their proper functioning.
This guide aims to assist you with common tasks. However, we recommend seeking assistance from a specialized provider if you encounter difficulties or have doubts regarding the administration, usage, or implementation of a service on a server.
Prerequisites
- Being the administrative contact for the VMware on OVHcloud infrastructure, and having received the connection credentials.
- An active user account with specific rights for NSX (created in the OVHcloud Control Panel).
- Having NSX deployed with two configured segments in your NSX configuration. Refer to our guide on NSX segment management for more information.
Instructions
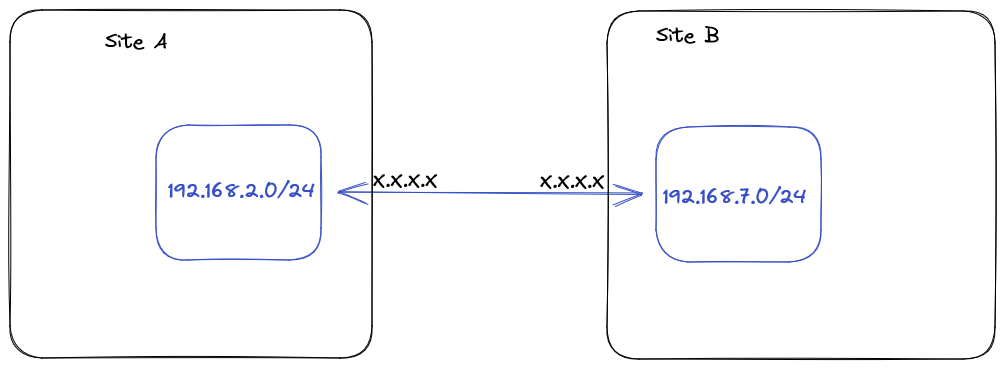
Here is the tunnel we want to establish between two infrastructures:
From the NSX interface, go to the Networking tab, select VPN under the VPN Services section and click on ADD SERVICE, then select IPSec.
Provide the following information:
- Name: Enter a name.
- Tier-0/Tier-1 Gateway: Enter
ovh-T0-gw | Tier-0.

Next, you need to specify the parameter type for the different IPSec stages. To do this, you will need to provide the IKE, IPSec, and DPD profiles (default profiles may already be provided).
From the NSX interface, go to the Networking tab, select VPN under the Profiles section, choose IKE PROFILES then click ADD IKE PROFILE.
Provide the following information with your parameters:
- Name: Enter a name.
- IKE Version: Enter the IKE version.
- Encryption Algorithm: Choose the algorithm.
- Digest Algorithm: Choose the algorithm.
- Diffie-Hellman: Choose the group.

Next, from the NSX interface, go to the Networking tab, select VPN under the Profiles section, choose IPSec PROFILES, then click ADD IPSEC PROFILE. Complete the IPSec information with your parameters.
Finally, from the NSX interface, go to the Networking tab, select VPN under the Profiles section. Choose DPD PROFILES and click ADD DPD PROFILE. Complete the DPD information with your parameters.
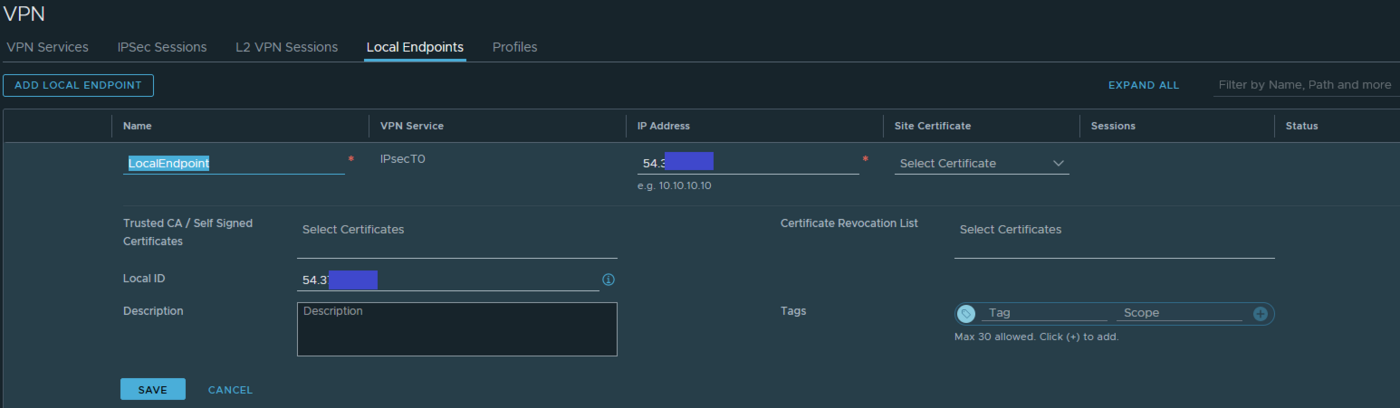
Next, you need to create a Local Endpoint:
From the NSX interface, go to the Networking tab, select VPN under the Local Endpoint section and click ADD LOCAL ENDPOINT.
Complete the following information with your parameters:
- Name: Enter a name.
- IPSec Service: Select the previously created VPN service.
- IP Address: Select an available IP from your range of public IPs associated with the PCC.
- Local ID: Enter the local ID of the IPSec tunnel.
Finally, you need to complete the IPSec session configuration.
From the NSX interface, go to the Networking tab, select VPN under the IPSec Sessions section and click ADD IPSEC SESSION.
Complete the following information with your parameters:
- Name: Enter a name.
- Type: Policy Based.
- VPN Service: Select the previously created VPN Service.
- Local Endpoint: Select the previously created Local Endpoint.
- Remote IP: Select the IP of the remote IPSec tunnel.
- Authentication Mode: Choose the authentication mode (e.g. PSK).
- Pre-shared Key: Enter the shared key for the IPSec tunnel.
- Local Networks: Enter the local networks to advertise.
- Remote Networks: Enter the remote networks to know.
- Remote ID: Enter the remote ID of the tunnel.
Under Advanced Properties, complete the following information with your parameters:
- IKE Profiles: The previously created IKE profile or default profiles.
- IPSec Profiles: The previously created IPSec profile or default profiles.
- DPD Profiles: The previously created DPD profile or default profiles.
If everything is properly configured on the other side, you should see a green "Success" status.
Go further
VMware Documentation on NAT in NSX
If you require training or technical assistance for the implementation of our solutions, contact your account manager or click this link to request a quote and a personalized analysis of your project from our Professional Services team.
Join our community of users on https://community.ovh.com/en/.

